Pistol Wizard Standards Home / Standards

Pistol Wizard Standards

There are 4 sets of Ranks in the Pistol Wizard training program, with 9 Achievements each. Students can earn them in-class or by sending a video showing a live fire demonstration of the achievement and the hits on target.

Gear Rules
Pocket Pistols (Fully Loaded)

Size Max: 6.75" x 5.5" x 1.375"
Weight Max: 32 oz

Other Pistols (Fully Loaded)

Size Max: 9" x 7" x 1.625"
Weight Max: 48 oz

Allowed holsters
  • An Inside the Waist Band holster.
  • An all-kydex pocket holster that fully covers the inside of the trigger guard.
  • A Level 2 or higher duty holster.
Allowed Belts & Magazine Pouches

Belts must work for all-day concealed carry or duty use. Mag pouches must be:

  • Close-topped, or
  • Take at least 6 lbs. to remove a fully loaded magazine. (Source: FBI testing standards .)
    Measure with a crane or hanging scale and a lanyard.

Allowed Ammo

280+ ft lbs. muzzle energy.

Other Rules
Ranking Up

Each time you earn an Achievement, you get a signed certificate. On earning all 9 Achievements in a Rank, you earn that Rank.

Overlapping Achievements

Achievements apply to all lower Ranks. If you earn Brown Belt Achievement 1, you earn Blue and Purple Belt Achievement 1.

Target Distance

If an Achievement has a distance in its title, that's the target distance. "Pairs, 7 yds" means all targets are 7 yds from you.

Targets

Use USPSA metric or IDPA targets.

Background

Neither USPSA nor IDPA targets do a great job with anatomy:
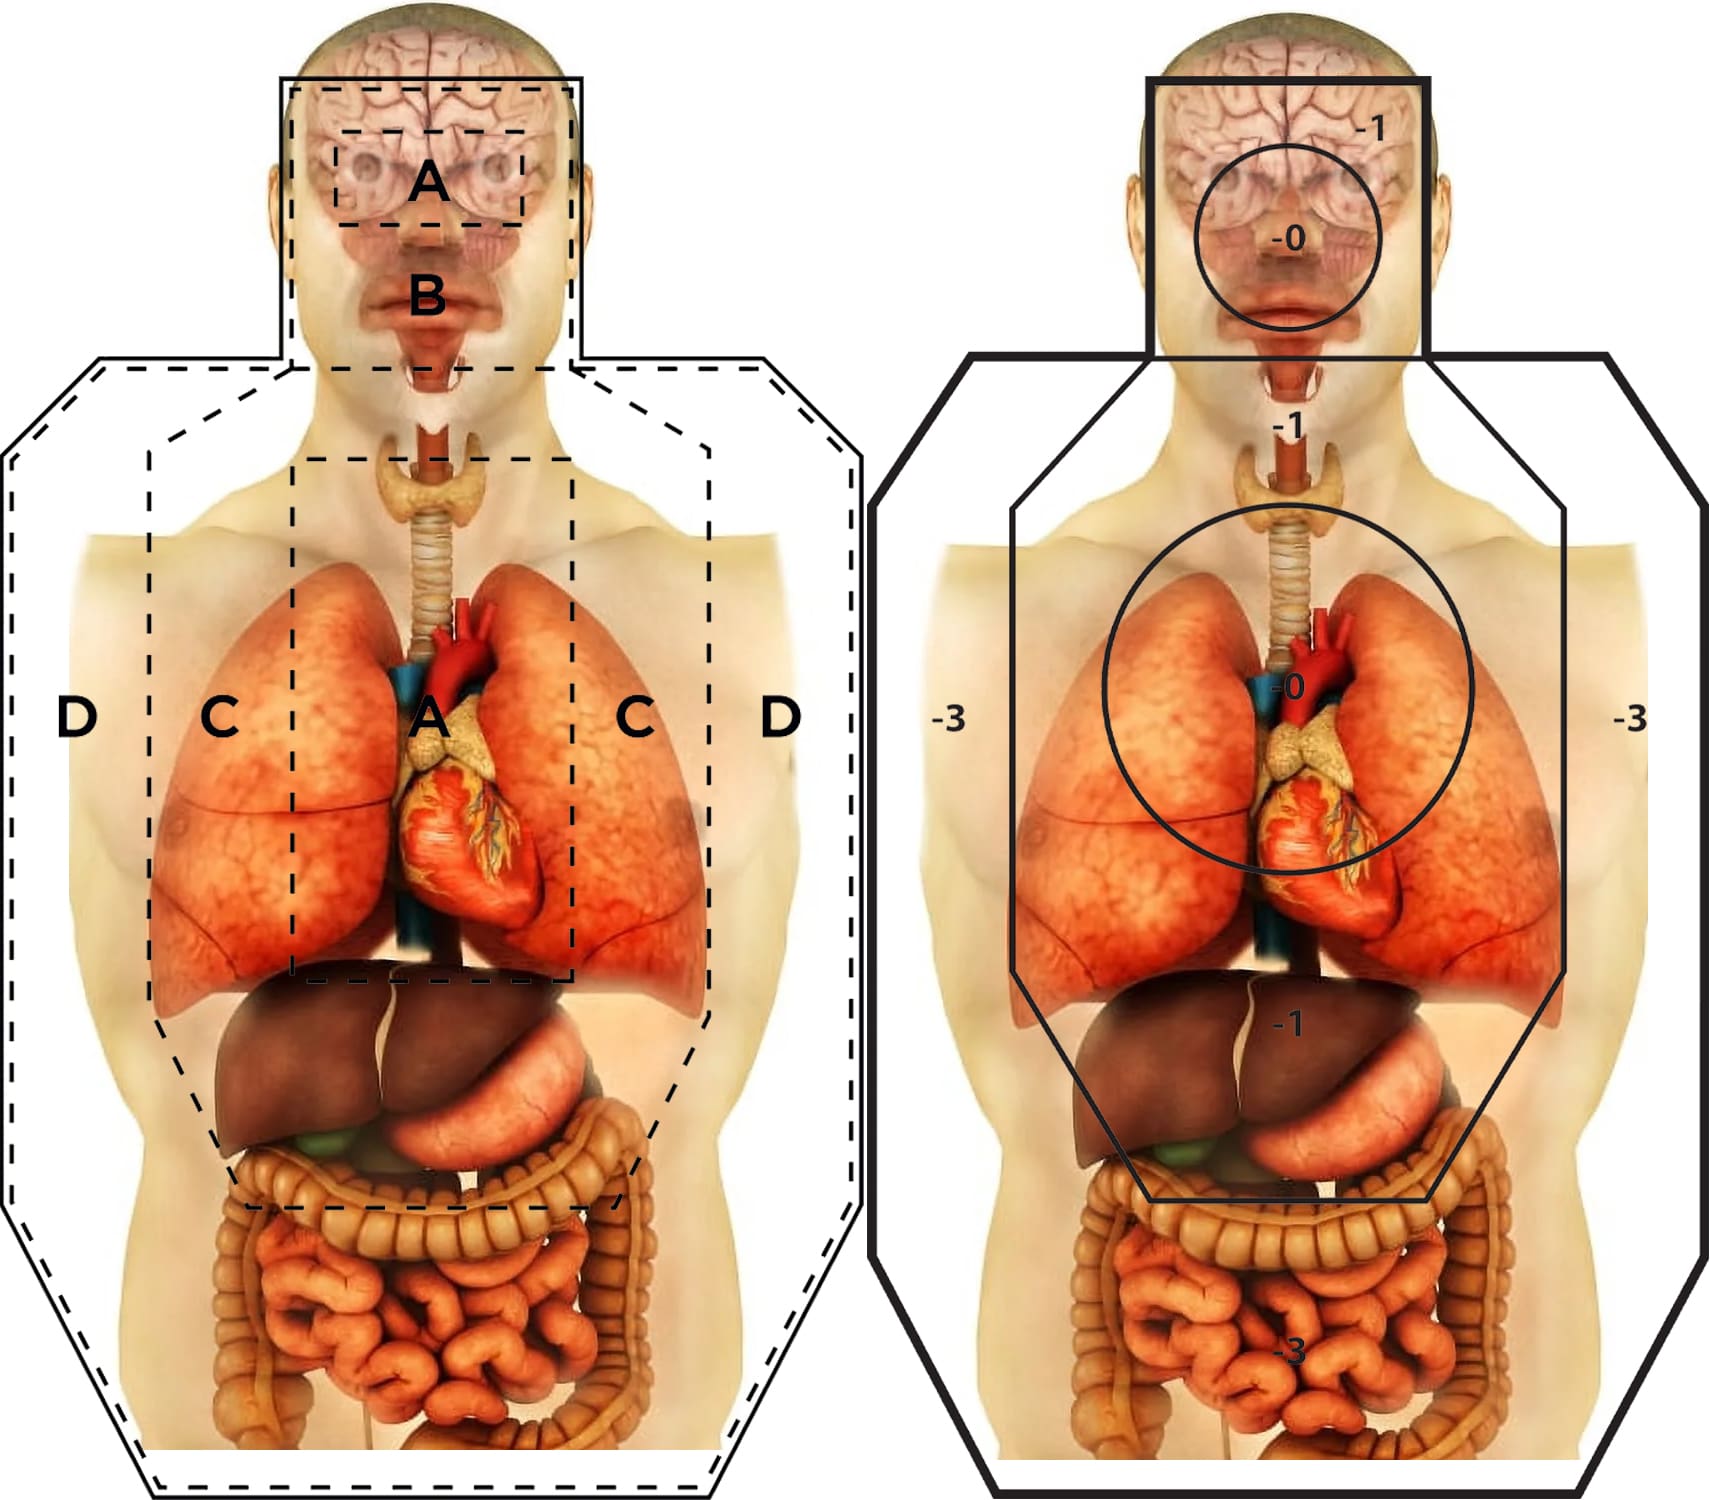
USPSA and IDPA targets overlaid on human anatomy torso.

Vital zones for the head and torso don't line up. The head's vital zone is too small. The spine isn't accounted for.

The scoring is worse. Someone shot in the heart often chooses to give up. But did you know they can fight on for 10-20 seconds? There are many cases on video where they use that time to keep fighting. Sometimes they kill their attacker. We can't assume people will just drop when shot like in Hollywood.

That is, unless someone gets shot in the brain or upper spine. Then they're done.

USPSA and IDPA are both sports, but they're to be practical sports. The most reward should favor what ends the fight the fastest. 2 shots center mass is not it.

The following changes are to better reflect pistol terminal ballistics while keeping scoring quick and easy with USPSA and IDPA targets.

Scoring

Unless specified:

  • Standards are scored on time.
  • Hits in the USPSA upper A Zone or IDPA upper -0 Zone cut your time by 0.20.
  • Hits in the rest of the head box, USPSA lower A Zone, or IDPA lower -0 Zone do not change your time.
  • Hits in the USPSA lower C Zone or IDPA lower -1 Zone add 0.20 to your time.
  • Hits in other zones are a miss. Fire a make-up shot.
Examples
If a drill says "draw & fire 2 shots in 2 seconds" on a USPSA target:
  • You land 2 hits in the lower A Zone in 2 seconds or less. You pass.
  • You land 1 hit in the lower A Zone and 1 in the lower C Zone in 2 seconds. Your time gets bumped up to 2.20. You fail.
  • You land 1 hit in the upper A Zone and 1 hit in the rest of the head box in 2 seconds. Your time gets cut to 1.80. You pass.
  • You land 1 hit in the head box, miss 1 shot, and land your third shot in the head box in 2 seconds. You pass.
  • You land 1 hit in the lower C Zone, 1 in the D Zone, and land your third hit in the lower C Zone in 2 seconds. Your time gets bumped up to 2.40. You fail.
  • You land 1 hit in the lower C Zone and 1 in the upper A zone in 2 seconds. Your time is unchanged. You pass.

1. Trigger Control at Speed

Blue Belt Trigger Control at Speed icon.

Source: Dry Fire Reloaded and Practical Shooting Training by Ben Stoeger et al.
Unload your gun. Load it with a laser cartridge. In our free Dry Fire App or a shot timer: At the beep, dry fire the gun (it goes "click") before the beep finishes making its sound. Repeat 10 out of 10 times without a miss.

Scoring

You miss if:

  • You hear the gun click after the beep sound ends (0.30 sec).
  • If you see the laser streak instead of a dot.

2. Pairs, 7 yds in 1.8 sec

Blue Belt Pairs icon.

Source: Dry Fire Reloaded and Practical Shooting Training by Ben Stoeger et al.
Draw and fire 2 shots.

3. Dead to Rights, 3 yds in 1.8 sec

Blue Belt Concealed Draw icon.

Draw from concealment and fire 1 shot. Repeat 10 out of 10 times without a miss. This can be done in dry practice with a laser cartridge.

Scoring

The hit must be in the head box of an IDPA or USPSA metric target. If using a laser cartridge, the laser must show as a dot. A laser streak means a poor grip and/or trigger press and is a miss.

4. Bill Drill, 7 yds in 3.0 sec

Blue Belt Bill Drill icon.

Source: Bill Wilson, IDPA co-founder.
Draw and fire 6 shots.

5. Blake Drill, 7 yds in 3.5 sec

Blue Belt Blake Drill icon.

Source: Practical Shooting Training by Ben Stoeger & Joel Park.
Set 3 targets 1 yd apart. Draw and fire 2 shots per target.

6. 4 Aces, 7 yds in 5.0 sec

Blue Belt 4 Aces icon.

Source: Dry Fire Reloaded and Practical Shooting Training by Ben Stoeger et al.
Draw, fire 2 shots, reload, and fire 2 more.

7. Bar Hop 1, 5 yds in 3.0 sec

Blue Belt Bar Hop icon.

Source: Practical Shooting Training by Ben Stoeger & Joel Park.
Set 1 IDPA or USPSA metric target 5 yds away. Put a stick perpendicular to the target and start on one side of it. At the beep, draw, fire 2 shots, step to the other side of the stick, and fire 2 more shots.

8. 4 Step 2, 5 yds in 3.5 sec

Blue Belt 4 Step 2 icon.

Set 2 targets 4 yds apart left to right. Point 1 (P1) is 5 yds from T1. Point 2 (P2) is 4 yds right of Point 1. Start to the left of P1, or the right of P2. Draw and fire 2 shots on T1 while left of P1, and 2 shots on T2 while right of P2.

9. Zed Drill, 7 yds in 2.5 sec

Blue Belt Zed Drill icon.

Draw and fire 3 shots.

Scoring

At least 1 shot must be in the head box. All other hits must be in head box, A zone (USPSA), or -0 zone (IDPA).

1. Practical Accuracy, 15 yds in 4.0 sec

Purple Belt Practical Accuracy icon.

Source: Practical Shooting Training by Ben Stoeger & Joel Park.
Draw and fire 6 shots. Fire each shot after the 1st once you see the sights recover.

Scoring

All hits must be in the head box of an IDPA or USPSA metric target.

2. Pairs, 25 yds in 2.5 sec

Purple Belt Pairs icon.

Source: Dry Fire Reloaded and Practical Shooting Training by Ben Stoeger et al.
Draw and fire 2 shots.

3. Dead to Rights, 5 yds in 1.4 sec

Purple Belt Concealed Draw icon.

Draw from concealment and fire 1 shot. Repeat 10 out of 10 times without a miss. This can be done in dry practice with a laser cartridge.

Scoring

The hit must be in the head box of an IDPA or USPSA metric target. If using a laser cartridge, the laser must show as a dot. A laser streak means a poor grip and/or trigger press and is a miss.

4. Matt Xray Alpha Drill in 4.0 sec

Purple Belt MXAD icon.

Source: Matt Pranka.
Set an IDPA or USPSA metric target 5 yds and another 12 yds away from your Start Point. They should have no gap from left to right between them when seen from the Start Point. Draw and fire 6 shots on the near target and 2 on the far one.

5. Blake Drill, 7 yds in 3.0 sec

Purple Belt Blake Drill icon.

Source: Practical Shooting Training by Ben Stoeger & Joel Park.
Set 3 targets 1 yd apart. Draw and fire 2 shots per target.

6. 4 Aces, 7 yds in 3.5 sec

Purple Belt 4 Aces icon.

Source: Dry Fire Reloaded and Practical Shooting Training by Ben Stoeger et al.
Draw, fire 2 shots, reload, and fire 2 more.

7. Bar Hop 2, 7 yds in 4.0 sec

Purple Belt Bar Hop icon.

Source: Practical Shooting Training by Ben Stoeger & Joel Park.
Set 2 IDPA or USPSA metric targets 7 yds away and 1 yd apart. Put a stick perpendicular to the midpoint between the targets and start on one side of it. At the beep, draw, fire 2 shots on each target, step over the other side of the stick, and fire 2 more shots on each target.

8. 4 Step 4, 7 yds in 3.5 sec

Purple Belt 4 Step 4 icon.

Set 4 targets 1 yd apart left to right. Point 1 is 7 yds from T1. Point 2 is 4 yds right of Point 1. Draw and fire 2 shots on T1 while left of P1, T2 & T3 while between Points, and T4 while right of Point 2. This can be done in any order.

9. Accelerator in 8.0 sec

Purple Belt Accelerator icon.

Source: Practical Shooting Training by Ben Stoeger & Joel Park.
Set T1 7 yds away, T2 15 yds away, and T3 25 yds away. T2 is set between T1 and T3, spaced 1 yd apart from each.

At the beep, draw & fire 2 shots per target, reload, and fire 2 more per target.

1. Practical Accuracy, 15 yds in 3.0 sec

Brown Belt Practical Accuracy icon.

Source: Practical Shooting Training by Ben Stoeger & Joel Park.
Draw and fire 6 shots. Fire each shot after the 1st once you see the sights recover.

Scoring

All hits must be in the head box of an IDPA or USPSA metric target.

2. Pairs, 25 yds in 2.0 sec

Brown Belt Pairs icon.

Source: Dry Fire Reloaded and Practical Shooting Training by Ben Stoeger et al.
Draw and fire 2 shots.

3. Dead to Rights, 7 yds in 1.2 sec

Brown Belt Concealed Draw icon.

Draw from concealment and fire 1 shot. Repeat 10 out of 10 times without a miss. This can be done in dry practice with a laser cartridge.

Scoring

The hit must be in the head box of an IDPA or USPSA metric target. If using a laser cartridge, the laser must show as a dot. A laser streak means a poor grip and/or trigger press and is a miss.

4. Bill Drill, 7 yds in 2.0 sec

Brown Belt Bill Drill icon.

Source: Bill Wilson, IDPA co-founder.
Draw and fire 6 shots.

5. Blake Drill, 7 yds in 2.5 sec

Brown Belt Blake Drill icon.

Source: Practical Shooting Training by Ben Stoeger & Joel Park.
Set 3 targets 1 yd apart. Draw and fire 2 shots per target.

6. 4 Aces, 7 yds in 2.5 sec

Brown Belt 4 Aces icon.

Source: Dry Fire Reloaded and Practical Shooting Training by Ben Stoeger et al.
Draw, fire 2 shots, reload, and fire 2 more.

7. Bar Hop 2, 7 yds in 3.0 sec

Brown Belt Bar Hop icon.

Source: Practical Shooting Training by Ben Stoeger & Joel Park.
Set 2 IDPA or USPSA metric targets 7 yds away and 1 yd apart. Put a stick perpendicular to the midpoint between the targets and start on one side of it. At the beep, draw, fire 2 shots on each target, step over the other side of the stick, and fire 2 more shots on each target.

8. Track the A-Zone in 3.5 sec

Brown Belt Track the A-Zone icon.

Source: Hwansik Kim.
Set 2 vision Barriers (a barrel stack or similar) 3 yds apart left to right. 7 yds from the Barriers, set 4 Targets. T1 and T2 are 1 yd apart, T2 and T3 are 2 yds apart, and T3 and T4 are 1 yd apart.

Start behind and to the left or to the right of the Barriers. Draw and shoot each target twice as follows:

  • T1 must be shot from the left of B1.
  • T2 & T3 must be shot from between B1 & B2.
  • T4 must be shot from the right of B2.

9. El Prez, 10 yds in 6.0 sec

Brown Belt El Prez Drill icon.

Source: Jeff Cooper.
Set 3 targets 10 yds away and 1 yd apart. Start facing away from the targets with your hands above your shoulders. At the beep, draw and fire 2 shots per target, reload, and fire 2 more shots per target.

1. Practical Accuracy, 25 yds in 3.0 sec

Black Belt Practical Accuracy icon.

Source: Practical Shooting Training by Ben Stoeger & Joel Park.
Draw and fire 6 shots. Fire each shot after the 1st once you see the sights recover.

Scoring

All hits must be in the head box of an IDPA or USPSA metric target.

2. Pairs, 15 yds in 1.5 sec

Black Belt Pairs icon.

Source: Dry Fire Reloaded and Practical Shooting Training by Ben Stoeger et al.
Draw and fire 2 shots.

3. Dead to Rights, 7 yds in 1.0 sec

Black Belt Concealed Draw icon.

Draw from concealment and fire 1 shot. Repeat 10 out of 10 times without a miss. This can be done in dry practice with a laser cartridge.

Scoring

The hit must be in the head box of an IDPA or USPSA metric target. If using a laser cartridge, the laser must show as a dot. A laser streak means a poor grip and/or trigger press and is a miss.

4. Matt Xray Alpha Drill in 2.3 sec

Black Belt MXAD icon.

Source: Matt Pranka.
Set an IDPA or USPSA metric target 5 yds and another 12 yds away from your Start Point. They should have no gap from left to right between them when seen from the Start Point. Draw and fire 6 shots on the near target and 2 on the far one.

5. Blake Drill, 7 yds in 2.0 sec

Black Belt Blake Drill icon.

Source: Practical Shooting Training by Ben Stoeger & Joel Park.
Set 3 targets 1 yd apart. Draw and fire 2 shots per target.

6. 4 Aces, 7 yds in 2.2 sec

Black Belt 4 Aces icon.

Source: Dry Fire Reloaded and Practical Shooting Training by Ben Stoeger et al.
Draw, fire 2 shots, reload, and fire 2 more.

7. Tracking Bar Hop, 7 yds in 3.0 sec

Black Belt Bar Hop icon.

Source: Ben Stoeger.
Set 2 IDPA or USPSA metric targets 1 yd apart left to right and 7 yds from your Start Point. Set a vision barrier (like a barrel stack) between the 2 targets and 1 yd away from your Start Point.

Start on one side of the vision barrier. At the beep, draw, fire 2 shots on each target, step over the other side of the vision barrier, and fire 2 more shots on each target.

8. Track the A-Zone in 3.0 sec

Black Belt Track the A-Zone icon.

Source: Hwansik Kim.
Set 2 vision Barriers (a barrel stack or similar) 3 yds apart left to right. 7 yds from the Barriers, set 4 Targets. T1 and T2 are 1 yd apart, T2 and T3 are 2 yds apart, and T3 and T4 are 1 yd apart.

Start behind and to the left or to the right of the Barriers. Draw and shoot each target twice as follows:

  • T1 must be shot from the left of B1.
  • T2 & T3 must be shot from between B1 & B2.
  • T4 must be shot from the right of B2.

9. Accelerator in 5.0 sec

Black Belt Accelerator icon.

Source: Practical Shooting Training by Ben Stoeger & Joel Park.
Set T1 7 yds away, T2 15 yds away, and T3 25 yds away. T2 is set between T1 and T3, spaced 1 yd apart from each.

At the beep, draw & fire 2 shots per target, reload, and fire 2 more per target.


TOP