Free Printable Targets for Dry Practice at Home
At home, you may only have your bedroom, living room, or garage for dry fire practice.
How do you simulate targets at 10 yards or more when all you have is 15 feet?
These targets are downscaled by 1/3, so each foot of distance simulates 1 yard of distance.
If you only have 15 feet at home, you can simulate 15 yards.
Click the image on each description, save it, print it, make as many copies as you want, and get out and train.
Print on 110 lb. card stock
for max durability.
Hang the targets with a loop of
Blue painter's tape .
It prevents damage to your walls while also keeping targets up.
We recommend using these targets with our Free Dry Fire App,
and our Guide to Dry Practice at Home,
but if you find a way to get more value from them, have at it.
All Targets
USPSA Targets
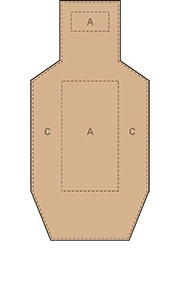
These targets balance being practical for defensive training with being clean and easy to read for competition scoring.
The chest on this more closely matches the heart and lungs on a person, while the head scoring is harsher than the real world.
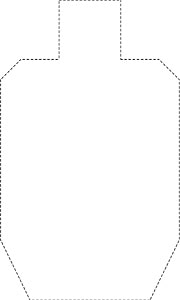
USPSA Metric, A & C Zones Only
This target is cut down to remove the D zone. Why?
Excepting maybe pelvic hits, shots to the D zone rarely results in a stop,
and in competition, you should only be getting A and close C hits.
USPSA No-Shoot
This includes the D Zone, since hitting a no-shoot anywhere in the real world
is the last thing you'd want to do.
Use these between targets in a target transition, or use them to obscure targets at different angles.
USPSA Partials
These are used in real matches for more challenge, and you can too in practice.
IDPA Targets
These targets balance being practical for defensive training with being clean and easy to read for competition scoring.
The head on these more closely matches real anatomy and terminal results, but the body does not.
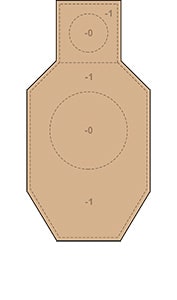
IDPA Target, -0 and -1 Zones Only
This target is cut down to remove the -3 zone. Why?
Excepting maybe pelvic hits, shots to the -3 zone rarely results in a stop,
and in competition, you should only be getting -0 and close -1 hits.
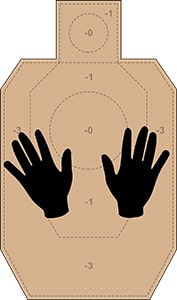
IDPA No-Shoot
This takes more time to read as a no-shoot,
as the only difference with a normal target is the hands.
Use these between targets in a target transition, or layer them over targets at different angles to increase difficulty.
2-inch Circles
These simulate 6 in. circles - the size of steel plate rack targets, or effective head shots.
Cut out each circle individually, or cut out each column and turn them 90º to make rows.
KR Training's KRT-2 Target
This target is closer to real anatomy than USPSA or IDPA targets,
while still being clean and easy to read for scoring.
Sage Dynamics Anatomical Targets
These are downscaled versions of targets by
Sage Dynamics .
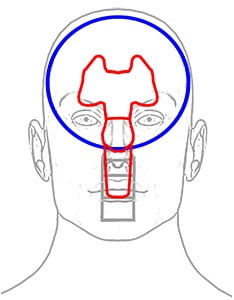
Sage Dynamics Anatomical Head
This is a front view of a human head and the "off switches" on it.
A hit in the blue circle (cranium) will probably stop a deadly threat immediately, at least long enough for you to improve your position or deal with other threats.
A hit in the red zone (brain stem) will instantly stop the threat, permanently.
Hits in the head outside of these zones may stop a threat,
but unless you hit the spine, it will probably be a psychological stop (they choose to stop, but can still continue the fight).

Sage Dynamics Anatomical Chest
This is a front view of a human chest, with the blue outline being the lungs and the red being the heart and main arteries.
Hits in the blue zone will slow down most threats.
Hits in the red zone will stop them in 10-20 seconds.
Hits in either zone may immediately stop them, but there's no guarantee.
Hits outside either zone (except the spine) will probably not stop a determined threat.
Disclaimer: As an Amazon Associate I earn from qualifying purchases, at no extra cost to you.
Feedback
Are you happy with this page?